
If a gaming PC becomes unresponsive or is generally slow when loading games, the problem is probably the RAM size. RAM, or Random access memory, acts as the short-term memory of your PC’s brain. It uses the RAM to store data that it needs temporarily or that it will need to access in the near future.
That means that if it is insufficient, the PC may become slow when performing memory-intensive tasks like gaming. So, even if the gaming PC has a decent graphics card or a large storage disc, it will still lag if the RAM required to process data is insufficient. And that is where a memory upgrade comes into the picture. Upgrading the RAM is a surefire way of enhancing your device’s performance and speed.

The Best Gaming RAM for Laptops in 2024
Have a new gaming laptop or one that needs a memory upgrade? Check out some of the best RAM modules!
The more RAM a gaming PC has, the smoother and faster everything runs and feels. The upgrade will give the gaming PC speedier startup times, high frames per second(FPS) when gaming, and the ability to multitask with various apps seamlessly. That said, how to install RAM is a question that many people grapple with.
Ready to give it a spin? Read on for a detailed guide on how to install RAM on a gaming PC RAM upgrade guide.
Step-by-Step Guide On How to Install and Upgrade RAM on a Gaming PC
Follow the steps below on how to install RAM or upgrade your gaming PC’s RAM in no time;
- Step 1: Before you do anything, shut down the PC and let it cool down for 10 to 15 minutes.
- Step 2: Next, unplug all the accessories, cables, and cords connected to the unit. These include things like a webcam, keyboard cord, monitor cable, LAN cord, mouse, or graphics card cord.
- Step 3: Open the unit’s case. Check the ownership manual for any particular information on how to go about it. Also, check for any instructions on upgrading or installing RAM on the gaming PC. This is crucial if the unit is new and you do not want to void the warranty. But generally, it usually involves unscrewing the screws (don’t forget where every screw goes). Keep the screws safe.
- Step 4 – IMPORTANT! After removing the case, before doing anything else, it is important to discharge the static electricity in your body. This prevents any parts inside the unit from getting damaged by the static electricity. To do this, touch any unpainted metal inside the unit.
- Step 5 – Locate the RAM slot. Again, the ownership manual can help here.
- Step 6 – After finding the slot, carefully remove the module. In computers that use clips to secure the modules, push the clips aside gently. The RAM will move slightly from the slot, making it easy to remove.
- Step 7 –Get the additional or new RAM module and gently align it with the DIMM slot. Ensure the edge with gold connectors is on the slot’s side, and the notch in the module should be aligned properly to slide away into the slot. Note that the RAM module can only be installed in one orientation. So ensure it is lined up well before installing it. There are small indents that correspond with a barrier inside the slot that indicates which direction it should be installed. Remember, don’t touch the gold connectors; you can easily damage them. Only touch the corners and edges of the modules.
- Step 8 – Confirm the RAM is aligned well, then push it inside. If the slot has a single open tab, start by inserting the module into the side that does not open. If the slot has two tabs, insert the module evenly. Now push it down evenly on both sides until you hear/feel a click, and tabs secure it. Most new boards usually feel stiff and may require some pressure to make this happen.
After securely installing the RAM, screw back the unit’s case and plug back all the connectors and cables in. And that’s all there’s to it on how to install RAM!

Best RAM to Pair with RTX 4060/4060 Ti
The G.SKILL Trident Z5 DDR5 RGB Series seems to be the RAM to beat for RTX 4060/4060 Ti. Here are some of the best RAM options to pair with the GPU.
Now boot up and enjoy a faster and more responsive gaming PC. The unit can now run smoothly even when loading memory-intensive games. Alternatively, to ensure that the newly installed RAM module is working properly, boot the gaming PC in the UEFI BIOS mode. Most units will show the key to press to enter the BIOS mode when they boot. But common examples are F12 and DEL. Press the key in question as soon as the motherboard splash screen appears.
Confirm the RAM Upgrade

After turning on the computer, check its RAM size again to ensure everything is running smoothly and the upgrade was successful. To do this, right-click “This PC or Computer” on the desktop and select “Properties.”
Check the computer’s RAM details and confirm if the size shown is the same that has been installed. If so, congratulations, the upgrade was successful!
Troubleshooting
If the PC is not booting, here are some fixes that can help;
- If the motherboard is beeping several times or there’s an error message: The RAM may not be well positioned. Turn the PC off and reinstall the module. Ensure all the modules are well secured and placed before turning on the computer.
- If the unit is not booting: Check the computer’s connections inside the unit. It’s easy to accidentally disconnect or bump a cable when upgrading the RAM.
- If there are other error messages: Check the ownership or user manual to find the correct fix.
Optimizing the New RAM
To get more from the new RAM on the gaming PC, optimize it for better stability and performance. This can be achieved by changing some settings in the UEFI or BIOS. To access the settings, press F2, F10, or Delete when booting the computer. Then, locate settings like DOCP or XMP. These profiles allow the RAM to operate at the advertised timings and speed. Also, check if the new sticks are in a dual channel mode if they have the same speed and size. After that, save and exit, and then restart the PC.
Related Products
-
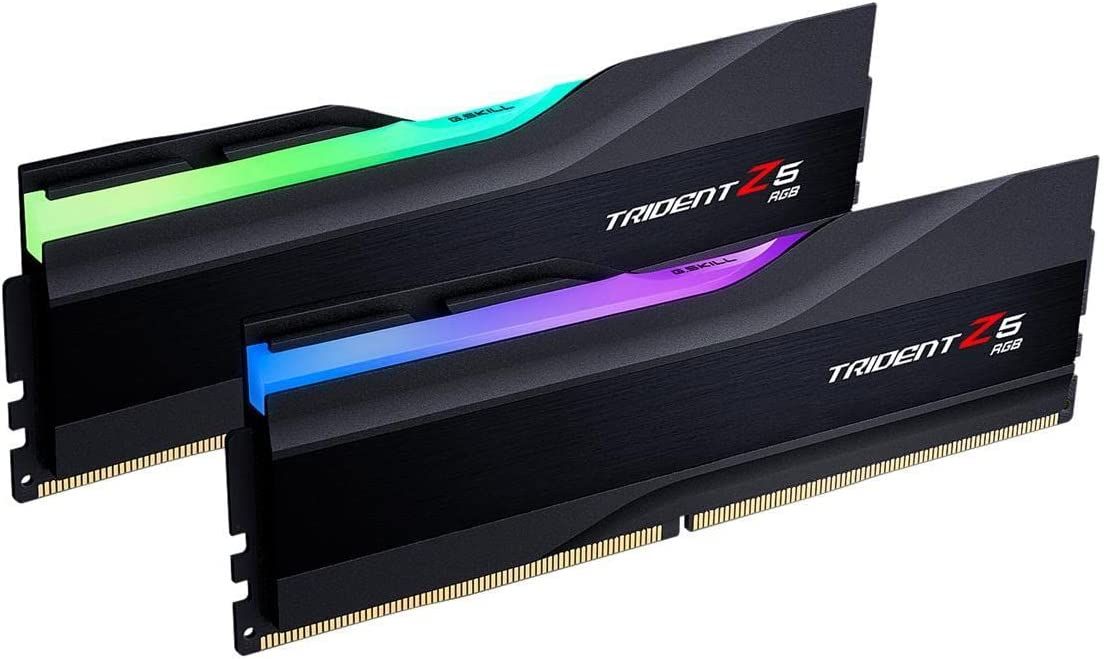
G.Skill Trident Z5 RGB Series 32G x 2 Kit (CL32)
Best Overall DDR5 RAM for PC Gaming
The G.Skill Trident Z5 RGB Series 6400MHz 32G x 2 Kit (CL32) offers excellent low latency 6400MHz (XMP) clocks that are in line with most AMD and Intel Enthusiast motherboard overclocking standards while improving on the looks of some of the best RGB lighting money can buy while keeping it subtle overall.
-
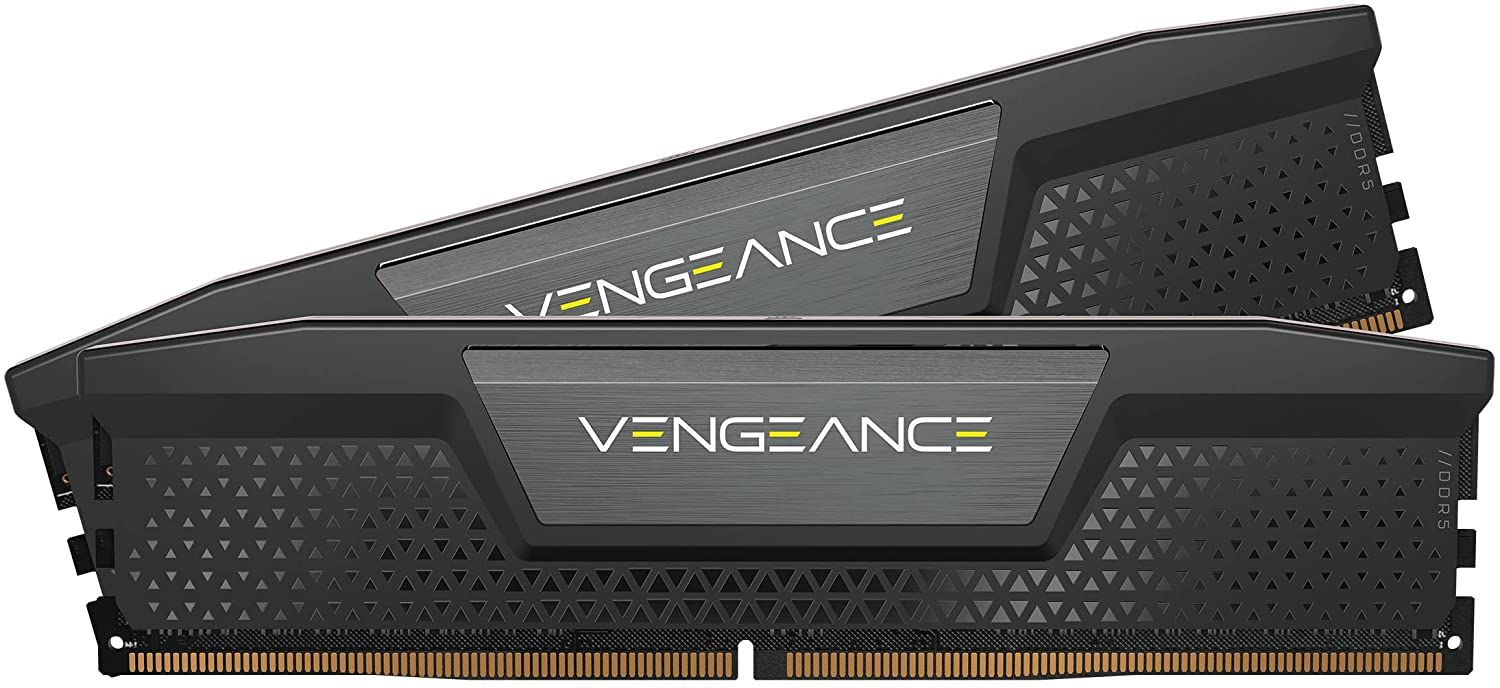
CORSAIR Vengeance DDR5 16G x 2 Kit (CL36)
Best Budget DDR5 RAM for PC Gaming
The CORSAIR Vengeance DDR5 5600MHz 16G x 2 Kit is a capable DDR5 RAM kit that delivers the performance that Intel’s latest 13th-generation processors demand at 5600MHz while not being too heavy on the wallet while being compatible with Intel’s latest market standard for XMP (3.0).
-
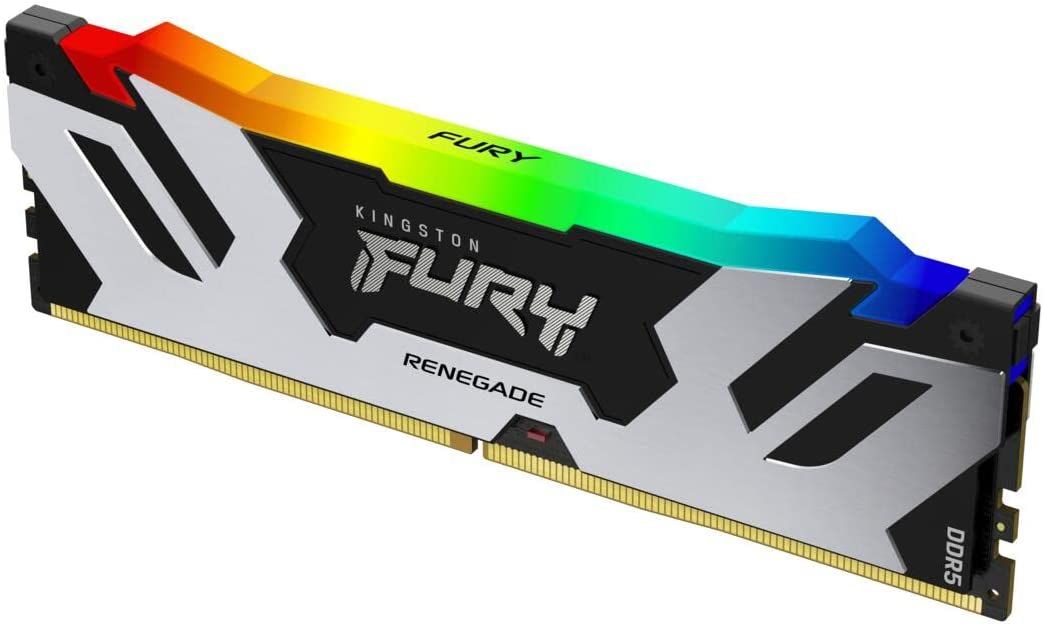
Kingston Fury Renegade RGB 32GB 7200MHz DDR5 CL38
Best Performance Overclocked DDR5 RAM for PC Gaming
The Kingston Fury Renegade RGB 32GB 7200MHz DDR5 CL38 is one of the highest-clocked DDR5 rams on the market that you can buy. While it is XMP compliant instead of EXPO, it should still hold similar clocks and timings for AMD’s processor set, making it one of the best overall overclocked memory.
-
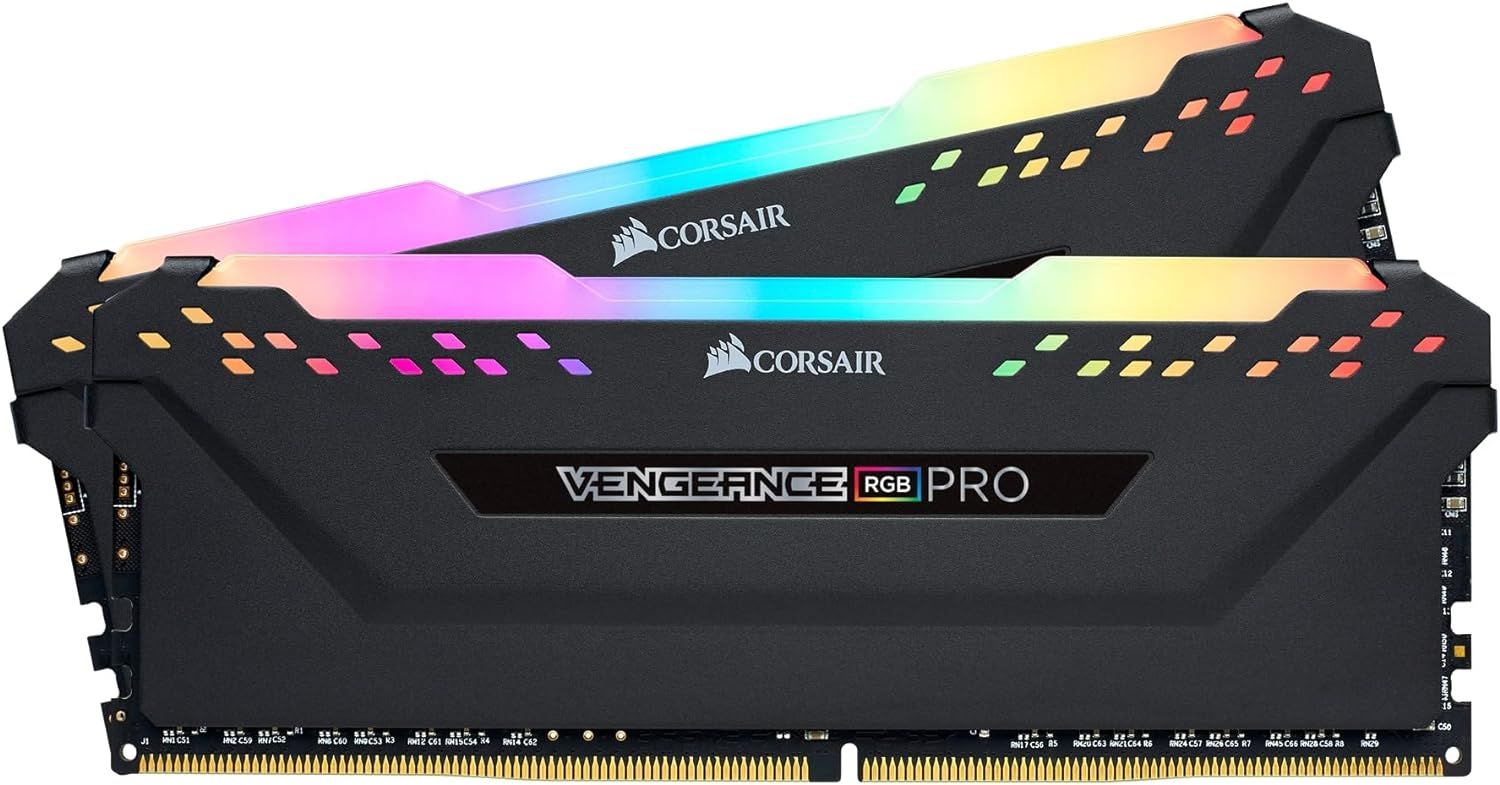
Corsair VENGEANCE RGB PRO DDR4 3600MHz
Best Overall DDR4 RAM for PC Gaming
This Corsair VENGEANCE RGB PRO DDR4 RAM kit is the ultimate solution for gamers, offering beautiful aesthetics, high clock speeds, and great overclocking support on Intel platforms. Easily tweakable through the BIOS and from iCUE software, the Vengeance RGB Pro makes life easier for modern gaming builds boasting DDR4 motherboards.


Now that we know how to install RAM or upgrade RAM on a gaming PC, here are a few things to consider when purchasing and installing the best gaming RAM.
What About the Risks Involved?
Because an authorized dealer or agent is not doing the upgrade, the process comes with some risks. For status, the computer’s sensitive parts can be damaged during the process. Also, the manufacturer’s warranty will likely be voided if there’s one.
What About the Type of RAM the Gaming PC Needs For the Upgrade?
The type of RAM the PC will need will depend on the motherboard. Check if it uses the older DDR3 or the latest standard DDR5. The other aspect to remember is whether the motherboard has 4 or 2 slots for the memory modules. Mini ITX boards usually have two, while micro ATX and full-sized boards often have four slots.

The Best GPUs for Core i7 14700K
The Intel Core i7 14700K is the fastest Core i7 yet. Not only it can crunch numbers fast, but with these GPUs, it can destroy any modern AAA title.
This means that if you want to upgrade to 64 GB of RAM, you can use two 32 GB modules or four 16GB modules on boards with four slots. Intensive activities like high-end gaming or streaming usually require more RAM storage, at least 32 GB, for a seamless performance.
What About Determining How Much RAM the PC Currently Has and The Configuration?
Knowing the amount of RAM the PC has is the easiest part here. Just head to the “About This PC” section on the gaming PC and check the RAM size. However, that is not all yet. A gamer should also know the RAM configuration. PCs usually have their memory installed in pairs, and different devices can have various numbers.
For instance, let’s say the gaming PC that needs to be upgraded has 32GB of RAM. To get the right information on the type of RAM compatible with the gaming PC, a gamer must know the number of memory slots on the motherboard, the number of modules installed, and if there are free slots. To find out, this information can be found inside the computer’s case, or a player can use a free hardware data tool like Speccy. Install and run the Speccy program, then on the left-hand side, hit RAM. It will show all the information required about the RAM on the right panel.

If there are a total of two slots, but only one slot is used up by two RAM modules with a total of 8 GB RAM, that means there are two, 4GB modules in place. So, to upgrade it, a gamer can replace or add two 16 GB modules on the slots to get 32 GB RAM.
However, if all the slots are filled with modules, one or all of them will need to be replaced by a larger module. For instance, if the modules on the two slots each have eight GB of RAM, to upgrade, replace one or both of them with 16 GB RAM or more.
What About The Amount of RAM that the PC Can Support?
Next, in determining the right RAM for upgrading the gaming PC, is knowing the RAM size that the PC can support. Two main factors come into play here: the maximum RAM size the motherboard can support and the full RAM size the Windows version of the PC can support.
To do this, start by identifying the type of motherboard the PC has. Most PCs support up to 32 GB, 64GB and more. To be sure, you can still use Speccy to check. On the left-hand side of the Speccy window, click on “Motherboard.” It will show you all the core information about the gaming PC on the right panel. Note the manufacturer and model, then search for its maximum RAM size in the ownership manual or online.

Regarding the operating systems Windows 10 and Windows 7, the 32-bit version only supports up to 4GB RAM. This applies to all editions. The 64-bit version, on the other hand, can support up to 2 TB of RAM for Windows 10 Enterprise, Professional, or Education and up to 128GB of RAM for Windows 10 Home. The 64-bit version of Windows 7 can support up to 8GB for the Home Basic edition, Professional up to 192 GB, and Home Premium up to 16 GB.
What About the Generation of RAM the Gaming PC Needs?
While there are many great motherboards for gaming, not all of them are compatible with all RAMs. Each board has a particular RAM designed for it. It is not possible to use gaming DDR5 RAM on a PC designed for DDR3 RAM. So, it is important to know what generation the PC supports. To be clear, here are some of the RAMs available depending on the generation;
- DDR2 RAM: Introduced in 2003, this is the oldest generation. Few computers use it today.
- DDR3 RAM: This one was first introduced in 2007 and is mostly found in older computers.
- DDR4 RAM: This one came into the equation in 2014. It is not only very common in PCs built in the last 10 years, but also very prevalent in 2023.
- DDR5 RAM: Introduced in 2021 for consumer CPUs and motherboards, this is the newest kid on the block. The DDR5 RAM is very powerful and is commonly found in professional, prosumer, and enthusiast gaming computers.
So, with that in mind, how can one determine the right generation for their gaming computer? Again, we will need Speccy’s help here. Head back to the RAM section on the left-hand side. Then, on the right, click on “SPD.” All the information regarding the manufacturer, size, model number, and generation is right there!

In this case, it is DDR3 memory. So, to upgrade this PC, we will need DDR3 RAM.
What About RAM Speed/Frequency and Latency?
When shopping for a RAM module, coming across terms like RAM Latency or speed is very common. A RAM frequency of 2400 MHz will perform less better than a 3600 MHz one. For gaming, the higher the frequency, the snappier the loading times, as the computer can access data faster.
Latency or timings refers to the number of clock cycles a RAM module requires to access its hardware. The lower the CAS latency or CL, the faster it can access the data. A RAM with a CL14 is faster than one with a CL18. Latency timings usually include four numbers, i.e., 16-19-19-39, representing the CL, tRCD, tRP, and tRAS, respectively.
The Best Gaming RAM for Laptops in 2024
Have a new gaming laptop or one that needs a memory upgrade? Check out some of the best RAM modules!
However, note that latency and speed don’t make much difference because most of a PC’s gaming aspects are handled by the RAM and gaming graphics card. The only case where RAM with a low CL and high speed might be important is when a gamer wants very high frame rates—something like 144 frames per second or more.
For instance, it is possible to achieve such high frame rates when playing multiplayer games like Battlefield V or Call of Duty: Modern Warfare at 1440p at lower settings or when the rig is powerful enough. However, in single-player titles like Assassin’s Creed: Odyssey, achieving 144 FPS at 1080p is a tall order even on powerful PCs with 4K monitors or 1440p.
What About Where to Buy RAM?
Buying RAM is a bit expensive. As such, go for one from a trusted gaming PC retailer or manufacturer with a return policy or warranty. We strongly recommend a brand new one for upgrading a gaming PC. However, a refurbished one can also do the job; just make sure it has a warranty and get it from a qualified store. After you get the best RAM for gaming next, it’s time to install the RAM
FAQ
Q: Will installing extra RAM speed up my PC?
Yes, installing extra RAM on a gaming PC will definitely improve its speed and performance. If it is slow because of low RAM space, upgrading it will generally enhance the performance considerably.
Q: How much RAM is OK for gaming?
16GB of RAM is fine for most titles. It will give gamers high performance and speedy gameplay. The PC will run various games without any stuttering or lagging issues.
Q: How do I know which RAM to buy?
This information can be found on the PC under the system summary. Alternatively, a gamer can install a third-party app like Speccy to get more information about the RAM. Then, use the information to search online or on the manufacturer’s site and find out what type of RAM is compatible with the gaming PC.